
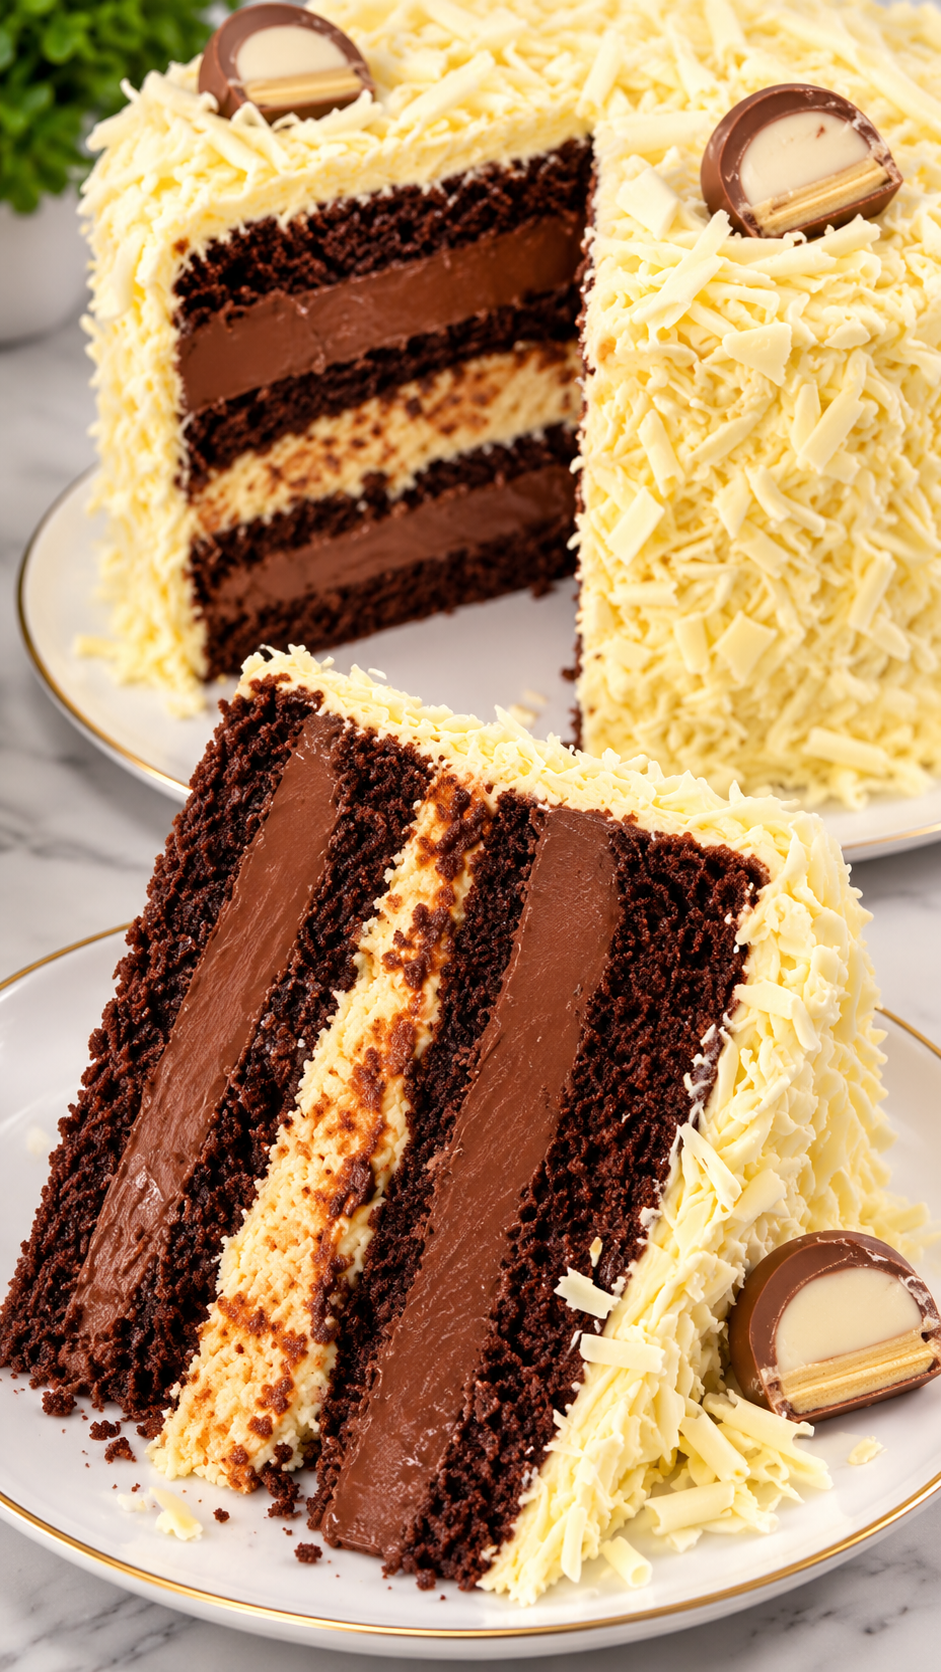
If you’re dreaming of a show-stopping chocolate dessert that looks like it came straight from a professional bakery, this Ultimate Bakery-Style Chocolate Layer Cake is the perfect recipe to try. With layers of rich, moist chocolate cake, fluffy vanilla cake, silky chocolate cream filling, and a beautiful white chocolate coating, every slice is a little piece of dessert heaven.
This elegant layer cake combines deep chocolate flavor with a smooth, creamy filling that creates the perfect balance of sweetness and richness. The outside is covered in fluffy white frosting and delicate white chocolate shavings, giving it a sophisticated bakery-style appearance.
The best part? Despite its impressive look, this homemade chocolate layer cake can be prepared using simple baking ingredients and a few easy techniques. Whether you’re celebrating a birthday, hosting a special dinner, or simply craving an indulgent homemade dessert, this cake is guaranteed to impress.
Why You’ll Love This Chocolate Layer Cake
- Beautiful bakery-style appearance: Tall layers, creamy filling, and white chocolate shavings create an elegant presentation.
- Rich chocolate flavor: Moist chocolate sponge layers provide a deep cocoa taste in every bite.
- Creamy filling: A smooth chocolate cream filling adds richness without making the cake feel too heavy.
- Delicious flavor combination: Chocolate and vanilla come together beautifully for a balanced dessert.
- Perfect for celebrations: This cake is ideal for birthdays, holidays, dinner parties, and special occasions.
- Make-ahead friendly: The cake layers and filling can be prepared in advance, making assembly easier.
Ingredients You’ll Need
This recipe makes one tall 8-inch layer cake, approximately 12–14 servings.
For the chocolate cake layers
- 2 cups (250 g) all-purpose flour
- ¾ cup (75 g) unsweetened cocoa powder
- 1¾ cups (350 g) granulated sugar
- 2 teaspoons baking powder
- 1½ teaspoons baking soda
- ½ teaspoon salt
- 2 large eggs, at room temperature
- 1 cup (240 ml) whole milk
- ½ cup (120 ml) vegetable oil
- 2 teaspoons vanilla extract
- 1 cup (240 ml) hot water or hot brewed coffee
For the vanilla cake layer
- 1 cup (125 g) all-purpose flour
- ½ cup (100 g) granulated sugar
- 1 teaspoon baking powder
- ¼ teaspoon salt
- 1 large egg
- ½ cup (120 ml) whole milk
- ¼ cup (60 ml) unsalted butter, melted and cooled
- 1 teaspoon vanilla extract
For the creamy chocolate filling
- 8 ounces (225 g) cream cheese, softened
- ½ cup (115 g) unsalted butter, softened
- 2½ cups (300 g) powdered sugar
- ½ cup (45 g) unsweetened cocoa powder
- ½ cup (120 ml) heavy whipping cream
- 1 teaspoon vanilla extract
- 4 ounces (115 g) melted semi-sweet chocolate, cooled slightly
- Pinch of salt
For the white chocolate frosting
- 1 cup (230 g) unsalted butter, softened
- 4 cups (480 g) powdered sugar
- 6 ounces (170 g) white chocolate, melted and cooled
- 3–4 tablespoons heavy cream
- 1 teaspoon vanilla extract
- Pinch of salt
For decoration
- 8 ounces (225 g) white chocolate, finely shaved or grated
- 4–6 small chocolate-covered candies or chocolate decorations
- Optional chocolate curls for the top
How to Make the Ultimate Bakery-Style Chocolate Layer Cake
Step 1: Prepare the cake pans
Preheat your oven to 350°F (175°C).
Grease two 8-inch round cake pans for the chocolate layers and one 8-inch round cake pan for the vanilla layer.
Line the bottoms with parchment paper and lightly grease the parchment as well. This helps the cakes release easily after baking.
If you only have two cake pans, bake the layers in batches.
Step 2: Mix the chocolate cake batter
In a large mixing bowl, whisk together the flour, cocoa powder, granulated sugar, baking powder, baking soda, and salt.
In a separate bowl, combine the eggs, milk, vegetable oil, and vanilla extract.
Pour the wet ingredients into the dry ingredients and mix on medium-low speed until just combined.
Slowly add the hot water or hot coffee while mixing on low speed. The batter will become quite thin, which is completely normal.
The hot liquid helps bloom the cocoa powder, creating a deeper and richer chocolate flavor.
Divide the batter evenly between the two prepared chocolate cake pans.
Step 3: Bake the chocolate layers
Place the pans in the preheated oven and bake for approximately 28–35 minutes.
The cakes are ready when a toothpick inserted into the center comes out with a few moist crumbs but no wet batter.
Remove the pans from the oven and let the cakes cool for approximately 10–15 minutes.
Carefully turn the cakes onto wire racks, remove the parchment paper, and allow them to cool completely.
Step 4: Prepare the vanilla cake layer
In a medium bowl, whisk together the flour, sugar, baking powder, and salt.
In another bowl, whisk the egg, milk, melted butter, and vanilla extract.
Add the wet ingredients to the dry ingredients and mix gently until the batter is smooth. Avoid overmixing, as this can make the cake dense.
Pour the batter into the prepared 8-inch cake pan.
Bake at 350°F (175°C) for approximately 20–25 minutes, or until a toothpick inserted into the center comes out clean.
Allow the cake to cool for 10 minutes before transferring it to a wire rack.
Let it cool completely before assembling.
Step 5: Make the creamy chocolate filling
In a large mixing bowl, beat the softened cream cheese and butter together until smooth and fluffy.
Add the powdered sugar, cocoa powder, and a pinch of salt gradually, mixing on low speed to prevent the dry ingredients from scattering.
Pour in the vanilla extract and melted semi-sweet chocolate.
Beat until the mixture becomes smooth and evenly combined.
Gradually add the heavy whipping cream, one tablespoon at a time, until the filling reaches a thick but spreadable consistency.
Continue beating for another 1–2 minutes until fluffy.
If the filling feels too soft, refrigerate it for approximately 15–20 minutes before assembling the cake.
Step 6: Prepare the white chocolate frosting
Place the softened butter in a large mixing bowl.
Beat on medium speed for approximately 3–4 minutes until pale and fluffy.
Gradually add the powdered sugar, mixing on low speed until incorporated.
Add the cooled melted white chocolate, vanilla extract, and a pinch of salt.
Pour in the heavy cream one tablespoon at a time until the frosting reaches a smooth, spreadable consistency.
Beat for another 2 minutes until light and fluffy.
The frosting should be firm enough to cover the cake while remaining soft enough to spread smoothly.
Step 7: Level the cake layers
Once all three cake layers are completely cool, use a serrated knife or cake leveler to trim any domed tops.
Try to make the layers as even as possible so the finished cake sits straight.
Place the first chocolate cake layer on a cake board or serving plate.
If the cake feels slightly dry, you can lightly brush the surface with a little simple syrup made from equal parts sugar and water.
Step 8: Assemble the chocolate and vanilla layers
Spread a generous layer of chocolate cream filling over the first chocolate cake layer.
Smooth it evenly using an offset spatula.
Carefully place the vanilla cake layer on top, pressing gently to secure it.
Add another generous layer of chocolate filling over the vanilla cake.
Place the second chocolate cake layer on top, positioning it carefully so the cake remains level.
Spread any remaining chocolate filling around the sides of the cake if needed to fill visible gaps.
Refrigerate the assembled cake for approximately 20–30 minutes to help the layers become stable before frosting.
Step 9: Apply the white chocolate frosting
Spread a thin layer of white chocolate frosting over the entire cake. This is called a crumb coat and helps trap loose crumbs.
Refrigerate the cake for approximately 20 minutes until the crumb coat firms up.
Apply the remaining white chocolate frosting over the top and sides.
Use an offset spatula or cake scraper to smooth the surface.
For a bakery-style finish, keep the sides relatively even while leaving a slightly decorative texture around the edges.
Step 10: Decorate with white chocolate shavings
Finely shave or grate the white chocolate using a vegetable peeler or grater.
While the frosting is still slightly soft, gently press the white chocolate shavings onto the sides of the cake.
Continue around the entire cake until it is generously covered.
Sprinkle additional white chocolate shavings over the top.
Finish with a few chocolate-covered candies or chocolate curls for an elegant decorative touch.
Step 11: Chill and serve
Refrigerate the finished cake for at least 1 hour to allow the frosting and filling to set.
Before serving, let the cake sit at room temperature for approximately 15–20 minutes.
Use a sharp knife dipped in warm water and wiped dry between slices to create clean, beautiful layers.
Each slice should reveal alternating chocolate and vanilla cake layers, rich chocolate filling, and a delicate white chocolate exterior.
Tips for the Perfect Bakery-Style Layer Cake
Use room-temperature ingredients. Eggs, milk, butter, and cream cheese blend more smoothly when they are not cold. This helps create a more consistent cake batter and frosting.
Measure the flour correctly. Too much flour can make the cake dense. Use a kitchen scale whenever possible, or spoon flour into the measuring cup and level it without packing.
Don’t overmix the batter. Once the flour is incorporated, stop mixing. Overmixing develops gluten and can make the cake tough.
Use hot coffee for deeper chocolate flavor. Coffee enhances the flavor of cocoa without making the finished cake taste strongly of coffee. Hot water works perfectly well if you prefer not to use coffee.
Cool the cake completely. Never spread chocolate filling or white chocolate frosting over warm cake layers. The heat can soften the filling and cause the frosting to slide.
Chill between assembly stages. Refrigerating the cake briefly before applying the final frosting helps keep the layers stable.
Use good-quality white chocolate. Choose real white chocolate containing cocoa butter for the smoothest melting and best flavor. Avoid overheating it, as white chocolate can become grainy or seize.
Delicious Variations to Try
Chocolate Raspberry Layer Cake
Add a thin layer of raspberry preserves over the chocolate filling between the cake layers.
The fruity tartness creates a delicious contrast with the rich chocolate and sweet white chocolate frosting.
You can also decorate the top with fresh raspberries.
Chocolate Hazelnut Layer Cake
Replace a portion of the chocolate filling with chocolate hazelnut spread.
You can also add finely chopped toasted hazelnuts between the layers for extra crunch.
Triple Chocolate Layer Cake
For an even richer chocolate dessert, use dark chocolate, milk chocolate, and white chocolate throughout the recipe.
Add chocolate curls to the top and decorate the sides with a mixture of white and dark chocolate shavings.
Chocolate Strawberry Layer Cake
Spread a thin layer of strawberry preserves over the chocolate filling and add thinly sliced fresh strawberries between the layers.
Finish with white chocolate shavings and fresh strawberries on top.
If using fresh fruit between the layers, keep the cake refrigerated and serve it within a couple of days.
Mocha Chocolate Layer Cake
Replace the hot water in the chocolate cake batter with hot brewed coffee.
You can also add 1–2 teaspoons of instant espresso powder to the chocolate filling for a deeper mocha flavor.
What to Serve with Chocolate Layer Cake
This cake is rich and indulgent, so it pairs beautifully with simple accompaniments.
- Fresh strawberries: Their natural sweetness and slight acidity balance the chocolate.
- Raspberries: A tart fruit that complements the creamy filling.
- Vanilla ice cream: Adds a cool, creamy contrast to the rich cake.
- Freshly brewed coffee: A classic pairing that enhances the chocolate flavor.
- Hot tea: Black tea or vanilla tea works beautifully with the sweet frosting.
- Whipped cream: A light spoonful of unsweetened whipped cream makes each slice feel even more luxurious.
For a special occasion, serve each slice with a few fresh berries and a small drizzle of melted chocolate.
Make-Ahead Instructions
This cake is an excellent dessert to prepare in advance, especially for celebrations.
Cake layers: Bake the chocolate and vanilla cake layers up to 2 days ahead. Allow them to cool completely, then wrap each layer tightly in plastic wrap and refrigerate.
Chocolate filling: Prepare the chocolate filling up to 2 days in advance and store it in an airtight container in the refrigerator. Before using, let it soften slightly and beat briefly until spreadable.
White chocolate frosting: Prepare the frosting a day ahead and refrigerate it in an airtight container. Bring it closer to room temperature and beat again before decorating.
Assembled cake: The finished cake can be assembled and refrigerated a day before serving. Keep it covered to protect the frosting from absorbing refrigerator odors.
For the freshest appearance, add delicate decorative chocolate pieces shortly before serving.
How to Store Leftover Chocolate Layer Cake
Because this cake contains cream cheese and dairy-based fillings, it should be refrigerated.
Refrigerator: Store the cake in an airtight cake container or cover it carefully. It will keep for approximately 3–4 days.
Freezer: Individual slices can be frozen for up to 2 months for the best quality. Place the slices on a tray until firm, then wrap each piece tightly and transfer to a freezer-safe container.
Thawing: Thaw frozen slices overnight in the refrigerator. Allow them to sit at room temperature for 15–20 minutes before serving for the best texture.
Avoid leaving the finished cake at room temperature for extended periods because of the cream cheese filling.
Frequently Asked Questions
Can I make this chocolate layer cake without coffee?
Absolutely. Hot water works perfectly in the chocolate cake batter. Coffee simply enhances the cocoa flavor without making the cake taste strongly of coffee.
Can I use only chocolate cake layers?
Yes. You can make all three layers using the chocolate cake recipe. Divide the batter evenly between three 8-inch pans, adjusting the baking time as needed. Check each layer with a toothpick before removing it from the oven.
Why did my cake layers sink in the middle?
This can happen if the oven temperature is too low, the cake is underbaked, or the batter is overmixed. Make sure your oven is fully preheated and avoid opening the oven door too early.
How do I get clean cake slices?
Chill the assembled cake before slicing. Use a long, sharp knife dipped in warm water, wipe it clean, and repeat between cuts.
Can I use store-bought frosting?
Yes. If you’re short on time, you can use ready-made chocolate filling or white chocolate frosting. However, homemade frosting gives you better control over sweetness and texture.
Can I replace cream cheese in the chocolate filling?
You can use mascarpone for a milder, creamy filling. Keep it chilled and avoid overmixing, as mascarpone can become loose when beaten too much.
What is the best white chocolate for decorating?
Use good-quality white chocolate made with cocoa butter. A solid white chocolate bar is generally easier to shave than chocolate chips.
How do I prevent the white chocolate shavings from falling off?
Apply the shavings while the outer frosting is still slightly soft. Gently press them into the frosting rather than simply sprinkling them over the cake.
Can I make this cake in advance for a birthday?
Yes. You can bake the layers and prepare the fillings ahead of time, then assemble and decorate the cake the day before the celebration. Keep it refrigerated until serving.
A Show-Stopping Chocolate Dessert for Every Celebration
This Ultimate Bakery-Style Chocolate Layer Cake with Creamy Filling and White Chocolate Shavings is a beautiful combination of rich chocolate, delicate vanilla, smooth cream, and elegant decoration.
Its alternating cake layers create a stunning presentation when sliced, while the creamy chocolate filling and white chocolate frosting make every bite deliciously indulgent.
Whether you’re making it for a birthday, holiday gathering, family celebration, or simply because you love homemade chocolate desserts, this cake is guaranteed to make an impression.
Slice it generously, serve it with fresh berries or a cup of coffee, and enjoy a bakery-worthy dessert made right in your own kitchen.