
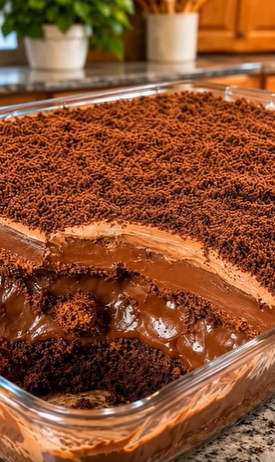
If you’re a true chocolate lover, get ready to fall in love with this incredible 4-Layer Chocolate Heaven dessert! Imagine four irresistible layers of chocolate goodness coming together in one beautiful baking dish: a rich chocolate cookie base, a smooth and creamy chocolate cheesecake layer, a silky chocolate pudding filling, and a fluffy chocolate topping finished with delicate chocolate shavings.
Every spoonful delivers a different texture, from the firm chocolate base to the velvety cream and rich chocolate filling. It’s decadent, incredibly satisfying, and perfect for anyone who loves homemade chocolate desserts.
The best part? You don’t need an oven to make it! This no-bake chocolate dessert comes together with simple ingredients, easy preparation, and a little patience while it chills in the refrigerator.
Whether you’re preparing something special for a birthday, holiday gathering, family dinner, or weekend treat, this 4-Layer Chocolate Heaven is guaranteed to impress. Prepare it ahead of time, refrigerate until set, and serve beautiful squares of pure chocolate indulgence.
Why You’ll Love This 4-Layer Chocolate Dessert
- Four delicious layers: Each layer brings a different texture and chocolate flavor, creating an irresistible combination.
- No baking required: Everything is assembled in a baking dish and chilled until perfectly set.
- Rich and creamy: Cream cheese, chocolate pudding, and whipped topping create an incredibly smooth dessert.
- Perfect for chocolate lovers: Chocolate cookies, cocoa, chocolate pudding, and chocolate shavings make every bite deliciously chocolatey.
- Great for entertaining: One large dish provides approximately 12–15 servings.
- Make-ahead friendly: Prepare it the night before and let the refrigerator do the work.
- Beautiful presentation: The contrasting layers look stunning when cut into squares.
Ingredients You’ll Need
This recipe makes one 9 × 13-inch dessert, approximately 12–15 servings.
Layer 1: Chocolate cookie crust
- 2 cups (220 g) chocolate sandwich cookie crumbs, such as Oreo-style cookies
- 5 tablespoons (70 g) unsalted butter, melted
Layer 2: Creamy chocolate cheesecake layer
- 8 ounces (225 g) cream cheese, softened
- ½ cup (60 g) powdered sugar
- ½ cup (120 ml) heavy whipping cream, cold
- ¼ cup (45 g) melted semi-sweet chocolate, cooled
- 1 teaspoon vanilla extract
Layer 3: Rich chocolate pudding layer
- 2 packages (3.4 ounces each) instant chocolate pudding mix
- 3 cups (720 ml) cold whole milk
- 2 tablespoons unsweetened cocoa powder, optional
- ½ teaspoon vanilla extract
Layer 4: Fluffy chocolate topping
- 1½ cups (360 ml) heavy whipping cream, cold
- ¼ cup (30 g) powdered sugar
- 2 tablespoons unsweetened cocoa powder
- 1 teaspoon vanilla extract
For decoration
- ½ cup (45 g) finely grated semi-sweet chocolate
- 2 tablespoons chocolate shavings
- Optional mini chocolate chips or chocolate curls
How to Make 4-Layer Chocolate Heaven
Step 1: Prepare the chocolate cookie crust
Place the chocolate sandwich cookies in a food processor and pulse until they become fine crumbs.
If you don’t have a food processor, place the cookies in a sealed plastic bag and crush them using a rolling pin.
Transfer the cookie crumbs to a mixing bowl.
Add the melted butter and stir until the crumbs are evenly coated and resemble wet sand.
Pour the mixture into a 9 × 13-inch rectangular baking dish.
Using the bottom of a measuring cup or a flat spatula, press the crumbs firmly into an even layer.
Place the dish in the refrigerator for approximately 20–30 minutes while preparing the next layer.
This chilling time helps the cookie crust become firm and prevents it from crumbling when the dessert is sliced.
Step 2: Prepare the creamy chocolate cheesecake layer
Place the softened cream cheese in a large mixing bowl.
Beat with an electric mixer for approximately 2 minutes until smooth and fluffy.
Add the powdered sugar and vanilla extract.
Continue beating until the mixture becomes creamy and no lumps remain.
Pour in the cooled melted semi-sweet chocolate and mix until fully incorporated.
In a separate chilled bowl, beat the cold heavy whipping cream until medium-stiff peaks form.
Gently fold the whipped cream into the chocolate cream cheese mixture using a silicone spatula.
Continue folding until the mixture is smooth, airy, and evenly combined.
Avoid overmixing because you want to preserve the light texture.
Remove the chilled cookie crust from the refrigerator.
Spread the chocolate cheesecake mixture evenly over the crust, reaching all the corners.
Smooth the surface with an offset spatula.
Return the dish to the refrigerator while preparing the pudding layer.
Step 3: Make the rich chocolate pudding layer
In a large mixing bowl, combine the two packages of instant chocolate pudding mix with the cold whole milk.
Add the optional cocoa powder and vanilla extract for a deeper chocolate flavor.
Whisk continuously for approximately 2 minutes until the pudding begins to thicken.
Allow it to stand for another 3–5 minutes.
The pudding should become thick, smooth, and creamy.
Carefully spoon the chocolate pudding over the cheesecake layer.
Spread it gently with a spatula, taking care not to disturb the layer underneath.
Smooth the surface evenly.
Place the dish in the refrigerator for approximately 15–20 minutes to help the pudding set slightly before adding the final layer.
Step 4: Prepare the fluffy chocolate topping
Pour the cold heavy whipping cream into a chilled mixing bowl.
Add the powdered sugar, cocoa powder, and vanilla extract.
Beat with an electric mixer on medium speed, gradually increasing to medium-high.
Continue beating until stiff peaks form.
The whipped cream should be fluffy and hold its shape when the beaters are lifted.
Be careful not to overbeat, as this can cause the cream to become grainy or turn into butter.
For an extra-smooth finish, sift the cocoa powder before adding it to the cream.
Step 5: Add the final chocolate cream layer
Remove the baking dish from the refrigerator.
Spoon the chocolate whipped cream over the pudding layer.
Spread it evenly using a spatula, creating a smooth surface from edge to edge.
For a decorative finish, create gentle swirls with the back of a spoon.
Make sure the topping is distributed evenly so every serving gets a generous amount.
Step 6: Decorate with chocolate shavings
Finely grate the semi-sweet chocolate using a grater or vegetable peeler.
Sprinkle the chocolate shavings generously over the entire surface.
Add chocolate curls or mini chocolate chips if desired.
For an elegant presentation, concentrate some of the larger chocolate curls in the center while keeping the rest of the surface covered with fine chocolate shavings.
The contrast between the dark chocolate decoration and fluffy chocolate cream makes this dessert look especially inviting.
Step 7: Refrigerate until perfectly set
Cover the baking dish carefully with plastic wrap or aluminum foil.
Place it in the refrigerator for at least 6 hours.
For the best results, refrigerate overnight.
This resting time allows the cookie crust to firm up, the cheesecake and pudding layers to stabilize, and the flavors to blend beautifully.
Step 8: Slice and serve
Once completely chilled, remove the dessert from the refrigerator.
Use a sharp knife to cut it into square portions.
For clean, professional-looking slices, dip the knife in warm water and wipe it dry between cuts.
Carefully lift each serving using a flat spatula.
Each square should reveal four beautiful layers: a chocolate cookie crust, creamy chocolate cheesecake, rich chocolate pudding, and fluffy chocolate cream topped with chocolate shavings.
Serve chilled and enjoy every delicious bite!
Tips for the Perfect 4-Layer Chocolate Heaven
Use softened cream cheese. Allow the cream cheese to sit at room temperature for approximately 30–45 minutes before preparing the cheesecake layer. This makes it easier to beat into a smooth, lump-free mixture.
Keep the whipping cream cold. Cold heavy cream whips more easily and holds its shape better. You can also chill your mixing bowl and beaters before whipping.
Use instant pudding mix. Make sure you purchase instant chocolate pudding rather than cook-and-serve pudding. Instant pudding thickens without cooking and is ideal for this no-bake recipe.
Don’t use warm melted chocolate. Allow the melted chocolate to cool before mixing it into the cream cheese. Warm chocolate can soften the mixture and affect its texture.
Press the cookie crust firmly. A compact base helps the dessert hold together when sliced and served.
Spread each layer gently. Use a spatula to distribute each mixture evenly without mixing it into the layer underneath.
Allow enough chilling time. Six hours is the minimum recommended chilling time, but overnight refrigeration produces the best results.
Use a warm knife for clean slices. Wiping the knife between cuts helps create neat layers and beautiful portions.
Delicious Variations to Try
One of the best things about this no-bake chocolate dessert is how easy it is to customize.
Triple Chocolate Heaven
For an even richer chocolate experience, use dark chocolate cookies for the crust, melted dark chocolate in the cheesecake layer, and semi-sweet chocolate pudding.
Finish with a mixture of dark, milk, and white chocolate shavings.
This variation is perfect for anyone who loves intense chocolate flavor.
Chocolate Peanut Butter Heaven
Add ½ cup creamy peanut butter to the chocolate cheesecake layer.
Beat it together with the softened cream cheese before adding the melted chocolate.
You can also drizzle melted peanut butter over the top before adding the chocolate shavings.
The combination of chocolate and peanut butter creates a deliciously rich dessert.
Chocolate Oreo Heaven
Replace the regular chocolate cookie crumbs with crushed chocolate sandwich cookies.
You can also fold ½ cup crushed cookies into the chocolate cheesecake mixture for extra crunch.
Finish with more crushed cookies and chocolate curls.
Chocolate Hazelnut Heaven
Add ½ cup chocolate hazelnut spread to the cheesecake layer.
For extra texture, sprinkle finely chopped toasted hazelnuts over the chocolate pudding before adding the final cream layer.
Finish with chocolate shavings and a light hazelnut drizzle.
White Chocolate and Dark Chocolate Heaven
Replace the semi-sweet chocolate in the cheesecake layer with melted white chocolate.
Keep the chocolate pudding and whipped cream layers as written.
This creates a beautiful contrast between the sweet white chocolate filling and rich dark chocolate layers.
Mocha Chocolate Heaven
Add 1–2 teaspoons instant espresso powder to the chocolate pudding mixture.
You can also add a little espresso powder to the melted chocolate before incorporating it into the cheesecake layer.
The coffee enhances the chocolate flavor and creates a delicious mocha-inspired dessert.
What to Serve with 4-Layer Chocolate Heaven
This dessert is rich and creamy, so it pairs beautifully with simple accompaniments.
- Fresh strawberries: Their natural sweetness and slight acidity balance the chocolate.
- Fresh raspberries: Add a fruity contrast to the rich chocolate layers.
- Vanilla ice cream: A small scoop makes each serving even more indulgent.
- Freshly brewed coffee: The slight bitterness of coffee complements the chocolate perfectly.
- Hot tea: Black tea or vanilla tea is a lovely choice after dinner.
- Fresh whipped cream: Add an extra dollop for an even creamier presentation.
For a beautiful dessert plate, serve one square with fresh strawberries and a few additional chocolate curls.
Make-Ahead Instructions
This 4-Layer Chocolate Heaven dessert is perfect for preparing in advance.
In fact, making it the day before serving is highly recommended because the extra chilling time allows the layers to become firm and develop a better texture.
The day before serving: Prepare all four layers, assemble the dessert, add the chocolate decorations, cover the dish, and refrigerate overnight.
Several hours ahead: You can prepare the cookie crust and chocolate cheesecake layer in advance. Keep the assembled dish refrigerated while preparing the remaining layers.
Before serving: Remove the dessert from the refrigerator, slice it into squares, and serve chilled.
If you’re preparing it for a party, add the final chocolate curls shortly before serving for a fresh decorative finish.
How to Store 4-Layer Chocolate Heaven
Because this dessert contains cream cheese, milk, and heavy whipping cream, it must be stored in the refrigerator.
Refrigerator
Cover the baking dish tightly with plastic wrap or transfer individual portions to an airtight container.
Refrigerate for up to 3 days for the best texture and quality.
Keep the dessert chilled until ready to serve.
Freezer
You can freeze individual portions in airtight freezer-safe containers for up to 1 month for the best quality.
Place the portions in the freezer until firm, then wrap them carefully to protect them from freezer odors.
Thaw overnight in the refrigerator before serving.
The texture of the whipped cream and pudding layers may change slightly after freezing, so refrigeration is the preferred storage method.
Serving leftovers
Always serve this dessert chilled.
Avoid leaving it at room temperature for more than 2 hours, or more than 1 hour in very hot conditions.
Frequently Asked Questions
Does this 4-layer chocolate dessert need to be baked?
No! This is a completely no-bake dessert. The cookie crust is made with crushed chocolate cookies and melted butter, while the remaining layers are prepared with cream cheese, pudding, and whipped cream.
Simply assemble everything and refrigerate until set.
How long does the dessert need to chill?
Refrigerate for at least 6 hours. Overnight chilling is recommended because it gives the layers enough time to firm up and makes slicing easier.
Can I use store-bought whipped topping?
Yes. You can replace the homemade chocolate whipped cream with approximately 8 ounces of thawed store-bought whipped topping.
For the final layer, gently fold in the cocoa powder and powdered sugar before spreading it over the pudding.
You can also use plain whipped topping if you prefer a lighter chocolate flavor.
Can I use homemade chocolate pudding?
Absolutely. You can use homemade chocolate pudding instead of instant pudding mix.
Make sure the pudding is completely cooled before spreading it over the cheesecake layer. It should be thick enough to hold its shape.
Why are my dessert layers mixing together?
This usually happens when one layer is too warm or too soft when the next layer is added.
Allow each layer to set slightly in the refrigerator before spreading the next one. Use gentle movements with your spatula rather than pressing down too firmly.
How do I make the cookie crust hold together?
Make sure the cookie crumbs are finely crushed and evenly mixed with melted butter.
Press the mixture firmly into the bottom of the dish using the flat bottom of a measuring cup. Refrigerate for at least 20–30 minutes before adding the cheesecake layer.
Can I make this dessert in individual cups?
Yes! Divide the cookie crust among small dessert glasses, then add the cheesecake, pudding, and whipped cream layers individually.
Refrigerate the cups for at least 4–6 hours before serving. Individual portions are especially attractive for parties and special occasions.
Can I use milk chocolate instead of semi-sweet chocolate?
Yes. Milk chocolate works well, but it is sweeter than semi-sweet chocolate. You may want to reduce the powdered sugar slightly in the cheesecake layer to keep the dessert balanced.
Can I prepare this dessert two days ahead?
Yes. You can prepare it up to 2 days ahead and keep it covered in the refrigerator. For the freshest appearance, add the final chocolate decorations shortly before serving.
How do I get perfectly clean square slices?
Make sure the dessert is thoroughly chilled. Use a sharp knife dipped in warm water, wipe it dry, and cut straight down. Clean the knife between every slice.
The Ultimate No-Bake Chocolate Dessert
This 4-Layer Chocolate Heaven dessert is everything a chocolate lover could want: a delicious chocolate cookie base, creamy chocolate cheesecake, rich pudding filling, and a fluffy chocolate topping finished with beautiful chocolate shavings.
Every layer brings something special, creating a dessert that is rich, smooth, fluffy, and wonderfully indulgent.
It’s easy to prepare, requires no oven, and can be made ahead of time for birthdays, holidays, family gatherings, or any occasion that deserves something sweet.
Prepare it the night before, let the refrigerator work its magic, and serve these beautiful chocolate layers chilled. One bite is all it takes to understand why this dessert deserves the name Chocolate Heaven!