
Oh my goodness, you guys, I just LOVE baking! Seriously, there’s nothing quite like the smell of a warm cake filling the house, is there? And let’s be honest, homemade treats always taste a million times better than anything you can buy at the store. Whenever I bake, it brings back memories of when I was a child with my grandmother, baking for hours! So, today, I’m SO excited to share my super simple, totally adorable Easy Heart Shaped Cake Tutorial! It is perfect for Valentine’s Day, anniversaries, birthdays, or just because you want to show someone some love! Trust me; it’s easy anyone can make this!
I remember the first time I made this for my husband. It wasn’t perfect, but the look on his face when he saw that heart, well, it was priceless. It’s truly amazing how a little bit of frosting and a simple shape can make someone feel so special!
Why You’ll Love This Easy Heart Shaped Cake Tutorial
Okay, so let me tell you why I think this Easy Heart Shaped Cake Tutorial is the BEST! It’s seriously a winner for a bunch of reasons:
- Super Simple: Honestly, even if you’re a baking newbie, you can totally nail this. No fancy skills required!
- Fast & Fun: From start to delicious finish, it takes hardly any time. Perfect for those last-minute celebrations.
- Totally Customizable: You can use ANY cake mix and frosting. Go wild with flavors!
- Impressive Results: It looks like you spent ages on it, but it’s our little secret how easy it was.
- Pure Love: Seriously, what’s not to love about a heart-shaped cake? Makes everyone smile!
Ingredients for Your Easy Heart Shaped Cake
Alright, so to make this magical Easy Heart Shaped Cake, you’re not going to need a TON of stuff, which is always a bonus! Here’s the line-up:
- 1 box of your favorite cake mix. Seriously, whatever flavor makes your heart sing, go for it!
- All the ingredients the cake mix box tells you to grab (usually eggs, oil, and water).
- A tub of frosting. Again, pick a flavor you love! Chocolate, vanilla, strawberry… the sky’s the limit!
That’s it! Easy peasy, right?
Equipment You’ll Need
Okay, so don’t get overwhelmed! You probably already have all this stuff in your kitchen. Here’s what you will need:
- A round cake pan (whatever size the cake mix calls for).
- An oven (obviously!).
- Mixing bowls (for the batter and frosting).
- A spatula or spoon for mixing.
- A knife or cake leveler (to cut the cake – be careful!).
- A plate or cake stand to serve it on.
Easy, right?
Step-by-Step Instructions: The Easy Heart Shaped Cake Process
Alright, friends, here’s the fun part – actually making that adorable heart cake! Don’t worry, it’s seriously a breeze. Just follow these steps, and you’ll be golden. Take your time, and remember, baking should be fun!
Step 1: Get That Cake Baked!
First things first, preheat your oven to the temperature listed on your cake mix box. Prep your round cake pan by greasing and flouring it (or using that amazing cake goop I mentioned before – works like a charm!). Next, get your batter ready. Mix up that cake mix according to the box directions. Careful, it splatters!
Pour the batter into the prepared pan and pop it in the oven. Bake it for the time the box tells you. Every oven is slightly different, so keep an eye on it. You’ll know it’s done when a toothpick inserted in the center comes out clean. Once it’s done, take it out and let it cool in the pan for about 10 minutes. Then, flip that beautiful cake out onto a wire rack to cool completely. This is KEY, you don’t want to frost a warm cake!
Step 2: Heart-Shaping Magic
Once your cake is totally cooled (and I mean COLD!), it’s time to make the heart! Grab a serrated knife or better yet a cake leveler. Carefully level the top of your cake if it has a dome. Now, here comes the fun part, cut your cake in half!
Place the two halves side-by-side on your serving plate, with the flat sides touching. Yep, you guessed it – it forms a gorgeous heart shape! Adjust the halves ever so slightly to make sure you love the shape of your heart.
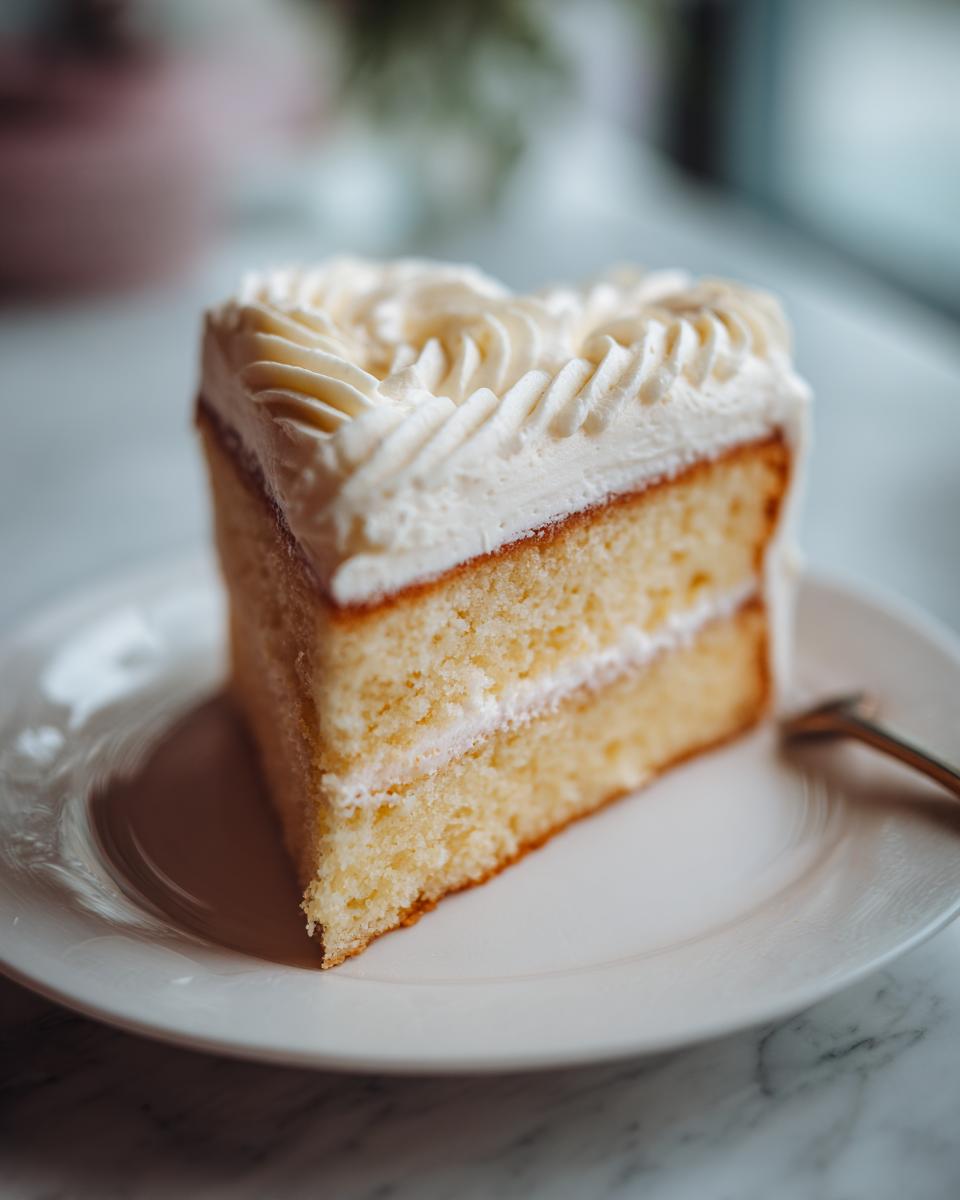
Step 3: Frosting Frenzy!
Now comes the delicious part! Frost that heart-shaped cake! Spread that frosting all over, making it as smooth (or as rustic!) as you like. Don’t worry about perfection; homemade is always best!

Tips for Success with Your Easy Heart Shaped Cake
Okay, so listen up, because I have some secret tips that’ll make your Easy Heart Shaped Cake a total showstopper! You know how sometimes cakes can be a little… tricky? Well, don’t worry, I’ve got your back!
Level That Cake!
So, sometimes the cake rises a little unevenly. No biggie! Use a serrated knife (carefully!) or a cake leveler to gently trim off the top. This gives you a flat surface for perfect heart halves. You’ll thank me later, trust me!
Cool It Down!
Make sure that cake is completely cool before frosting. Seriously, wait, even if you are impatient, I promise it’s worth it! Otherwise, you’ll end up with a melty, messy frosting situation. No one wants that!
Frosting Fun
If you’re not a frosting pro (I’m not!), don’t stress about making it perfect. Sometimes a slightly rustic, homemade look is even better! And If you want a smooth frosting, put the cake in the fridge for a little bit to harden up the frosting, then apply a second coat.

Variations on the Easy Heart Shaped Cake Theme
Okay, so once you nail this basic Easy Heart Shaped Cake tutorial, the fun *really* begins! You can totally jazz it up to match any occasion or taste. My favorite part is experimenting!
Want a chocolate heart? Use chocolate cake mix and chocolate frosting! Going for a more fancy look? Use different sprinkles or a beautiful drip frosting. You can add fresh berries on top for something a little lighter! I also love to add a little bit of extract to play with the flavors. Don’t be afraid to get creative; it’s all about making it YOUR cake!
Serving Suggestions for Your Easy Heart Shaped Cake
So, you’ve made this adorable heart cake. Now what?! Well, you totally need to make it a party! Here’s a few ideas to make this cake even MORE special, you know, because that’s even possible!
You can serve the cake alongside a scoop of vanilla ice cream. Or, if you’re feeling fancy, make some fresh whipped cream! You know, a little caffeine to get you through the day… Make a pot of coffee (or tea!), or perhaps some hot cocoa with marshmallows to warm things up. Just have fun with it, that’s what’s most important.

Storage and Reheating Instructions
Okay, so, you’ve baked and frosted this gorgeous Easy Heart Shaped Cake. (Yay, you!) But what if you have leftovers? (Which, let’s be honest, is rare, but it can happen!). Here’s the deal:
To keep your cake fresh, just pop it in an airtight container or cover it tightly with plastic wrap. Store it at room temperature for a day or two, or in the fridge for up to a week. If you’re freezing a whole cake, wrap it twice: Wrap in plastic wrap, then aluminum foil.
Reheating? You totally can! If you just want to soften up your frosting a bit, let the slices sit out for 20-30 minutes before serving. For a warm slice, microwave for 5-10 seconds. Enjoy!
Estimated Nutritional Information
Okay, so I’m no nutritionist, but here’s a rough idea of what you’re looking at when it comes to the numbers. Keep in mind, this is just an estimate, since it totally depends on what cake mix and frosting you use! But you should be in the neighborhood of:
- Calories: About 350 per slice
- Sugar: Roughly 30g per slice (Yikes!)
- Fat: Around 15g per slice
There’s also a little bit of protein, carbs, and all that jazz, but, honestly, it’s mostly about enjoying a delicious treat, right? Eat with joy!